Gizzomo 香港 - iPad/ iPhone/ iPod Touch 之 iOS 教學資訊網站
請確定你的 iPad, iPhone 及 iPod Touch 已經破解 (Jailbreak), 按此查看 iOS 主機破解教學.
這篇教學只適用於 iOS 4.3.0/ 4.3.1/ 4.3.2/ 4.3.3 版本. Gizzomo 香港本身有提供已修改的檔案可以供用家直接下載, 再上傳並取代原來檔案; 但受版權法所限, Gizzomo 香港不能在此提供/ 或可供大家下載已修改的 .plist 檔案 (即 Apple 的產物, 包括以下 .plist 檔案). 因此, 這篇教學對於新手來說或者會較為複雜; 建議先看一次才動手做. 若果仍無法解決, 請立即在 Gizzomo 香港之 iOS 支援討論平台提出, 讓 Gizzomo 香港的支援團隊協助解決.
這篇教學只適用於 iOS 4.3.0/ 4.3.1/ 4.3.2/ 4.3.3 版本. Gizzomo 香港本身有提供已修改的檔案可以供用家直接下載, 再上傳並取代原來檔案; 但受版權法所限, Gizzomo 香港不能在此提供/ 或可供大家下載已修改的 .plist 檔案 (即 Apple 的產物, 包括以下 .plist 檔案). 因此, 這篇教學對於新手來說或者會較為複雜; 建議先看一次才動手做. 若果仍無法解決, 請立即在 Gizzomo 香港之 iOS 支援討論平台提出, 讓 Gizzomo 香港的支援團隊協助解決.
Multi-touch Gestures 功能示範影片
1.) 在 iOS 主機及電腦分別安裝以下軟件
 |
在 iOS 主機 (Cydia) 安裝以下軟件 • OpenSSH 在電腦 (Windows/ Mac OS X) 安裝以下軟件 • WinSCP • Plist Editor (Windows) • Cyberduck (Mac OS X) 注意事項 請在此步驟在 iOS 主機及電腦 (Windows 或 Mac OS X 內安裝以上所需的軟件; 進入下一步前, 請確保已經安裝了上述軟件. |
2.) 使用 WinSCP 登入 iOS 主機
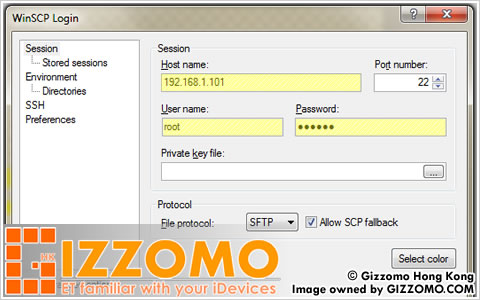 |
2.1.) 開啟 WinSCP.EXE, 並在跟隨下方指示輸入資料. Host Name: iOS 主機的 IP 地址 (按此查看如何取得主機的 IP 地址) Userame: root Password: alpine* *此為預設密碼; 若你曾更改, 請在此欄輸入自行設定的密碼. 注意事項 請確認 iOS 主機及電腦 (Windows/ Mac OS X) 在同一個 WiFi 網絡. |
3.) 使用 WinSCP 尋找及下載需要更改的檔案
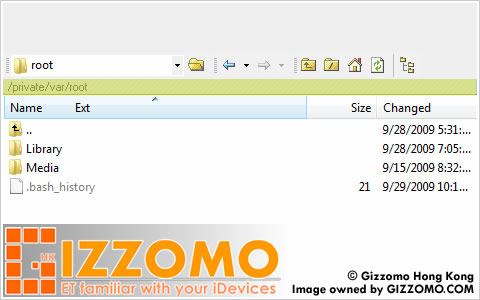 |
3.1.) 登入後, 在左方圖示的位置輸入以下路徑 (共有 3 個路徑位置). 3.2.) 同時下載需要更改的檔案至電腦 (共需下載 3 個檔案). 第一組 路徑: /var/mobile/Library/Preferences 尋找及下載: com.apple.springboard.plist 檔案 第二組 路徑: Applications/Preferences.app 尋找及下載: General.plist 檔案 第三組 路徑: System/Library/CoreServices/SpringBoard.app 尋找及下載: *.plist 檔案 *iPad 1: K48AP.plist *iPhone 3Gs: N88AP.plist|*iPhone 4: N90AP.plist *iPod Touch 3G: N72AP.plist|*iPod Touch 4G: N81AP.plist |
4.) 使用 plist Editor 更改第一組檔案
 |
4.1.) 使用 plistEditor.EXE 軟件. 4.2.) 並開啟 com.apple.springboard.plist (第一組) 檔案. 如左方圖示, 加入以下行列 完成後, 請儲存及上傳檔案至 /var/mobile/Library/Preferences (取代原來檔案) |
5.) 使用 plist Editor 更改第二組檔案
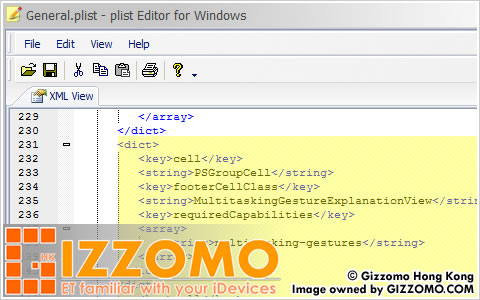 |
5.1.) 使用 plistEditor.EXE 軟件. 5.2.) 並開啟 General.plist (第二組) 檔案. 如左方圖示, 尋找以下行列 完成後, 請儲存及上傳檔案至 Applications/Preferences.app (取代原來檔案) |
6.) 使用 plist Editor 更改第三組檔案
 |
6.1.) 使用 plistEditor.EXE 軟件. 6.2.) 並開啟 *.plist (第三組) 檔案. *iPad 1: K48AP.plist *iPhone 3Gs: N88AP.plist|*iPhone 4: N90AP.plist *iPod Touch 3G: N72AP.plist|*iPod Touch 4G: N81AP.plist 如左方圖示, 加入以下行列 完成後, 請儲存及上傳檔案至 System/Library/CoreServices/SpringBoard.app (取代原來檔案) |
7.) 成功完成啟動 Multi-touch Gestures 功能
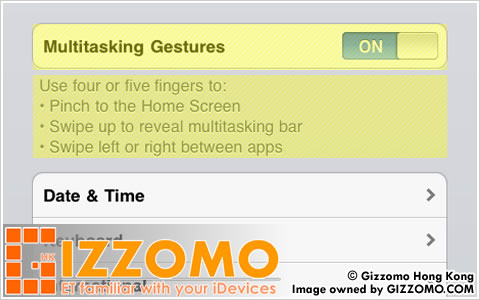 |
7.1.) 完成修改及上傳取代以上三個檔案後, 請重新啟動 iOS 主機. 7.2.) Multi-touch Gestures 功能能在「設定 > 一般」選項內找到. |


